The first controller we will be taking a look at is the Vantec Nexus Multi-Function Panel. The Nexus Multi-Function Panel is probably the most diverse device from all in the review because of its additional features. When I first received the Multi-Function Panel from Bill at CoolerGuys, I was a little unconvinced. After being a die hard DigiDoc 5 fanatic, switching to a new device, would have been quite an obstacle. I began to examine the options on the colorful box and came up with a list of features including everything from USB, Firewire, Fan controlling (Rheobus), Temperature monitors and exchangeable faceplates. Seeing all these options on just one unit is quite impressive, but as I said before, looks are not everything. The performance portion of the review determines a product's worthiness.

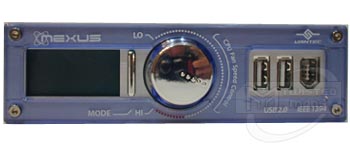
After pulling the Multi-Function Panel from its box, I began to sort the various cables, cords, faceplates and screws included with the actual Nexus unit. I was quite impressed after a short look with Nexus unit itself. Vantec decided to combine both a steel mounting construction with a very appealing brushed aluminum front, which matched my server's LianLi case perfectly. Covering the brushed aluminum front is a changeable translucent plastic. This allows the aluminum to be seen though it. The plastic face itself is held in place by one chrome hex screw in each corner, and the functions are clearly labeled in white lettering on each faceplate. While I was writing this review, I noticed that Vantec actually did pay attention to the small details. They put a nice 45 degree bevel on the edge of each faceplate and finished it off with a nice polish or glaze to make it CLEAR and give it a more finished look. All the controls are located on the front of the unit. This unit has (listed from left to right) an LCD which displays temperatures and fan RPM for one fan, a mode button (for switching between temperature probes), a Rheobus controlling knob (for controlling ONE fan) as well as two USB 1.1/2.0 ports and one Firewire (IEEE1394) port. The mode button and rheobus knob have a nice chrome-like finish which is fairly smooth, not bubbly/wavy like some chrome items I have seen in a couple of aluminum case fronts. As I flipped the unit around to the back, I was amazed with the simplicity of it! Without reading the included instructions, I was able to figure out where everything should be installed. For users who are not so familiar with connectors, the PCB has a few simple words printed in white which will assist in installation. Thus far, I noticed that the unit is capable of receiving temperature readings from up to three probes, RPM readings from only one fan as well as the connections for the two USB ports and one Firewire port. The entire unit is powered by a molex connector labeled "power..." simple enough right?

Also included with this package are connecting cables for the USB and Firewire ports, the fan power cable, three temperature probes, a bag of screws for installation as well as the two additional faceplates (totaling three). I was impressed with the USB and Firewire cables. Both cables were very much alike in that they had a clear casing which showed braided aluminum or steel. I am not much of an electrical fanatic, but a good guess says that this will help to cut down on any electro-magnetic interference inside the case which will essentially speed up transfer speeds. Aside from this, I noticed that the connectors which plugged into the rear of the Multi-Function Panel were labeled to allow easy installation. Many front access panels either preinstalled into cases or bought separately have to be manually added directly to the motherboard PIN by PIN. This is extremely hard without a motherboard instruction manual. Some people may disagree with me on this, but I actually find it MUCH more convenient and simple to just place a MALE connector on the end of the front access panels and loop them into the port on the motherboard located in the back. Vantec must have agreed with me on this one because that's exactly what they did! This saves time during installation and makes it easy for any level of pc enthusiast. Both cables are three foot in length which is just about the right size to install into a mid-sized case with little slack. This may cause problems in larger server cases where the 5.25" bays are located a bit farther away. The three temperature probes are very similar to my DigiDoc 5 temperature probes as they are a thin black wire with orange tips. They are two feet in length which is plenty long to allow positioning anywhere in the case. The two additional faceplates are identical to the originally installed but have different colored acrylic. The one main unique quality of this device is its ability to change color to match anyone's style. Included are green, purple and blue faceplates...my personal favorite being the blue! A small hex tool is included to change the faceplates.
 ?????
?????
After installing the unit into the LianLi PC7 tester, I installed the firewire cord into the Audigy sound card. Next I connected the two USB connectors into the rear motherboard ports as well as set up each of the three temperature probes. I placed one temperature probe on the ThermalTake Volcano9 heatsink, one in my 5.25" drive cage as well as one on the heatsink of my Visiontek GeForce 3 ti200 video card. Next, I installed the CPU fan cable and then the cable for the motherboard fan header. The last thing that was required for installation was hooking the power into an empty molex connector. Immediately after powering my system back on, was able to see the LCD light up with atrocious green backlight and black text. Apparently Vantec thought that a bright green LCD screen might match well with a blue front. I am not sure what they were thinking. With this in mind, and an idea for a new guide, I pulled the unit back out and tried to see if changing the backlights would be possible. Not to let you down, but changing the four green backlights to another color would require unsoldering the LCD itself (36 solders total), changing the four backlights then resoldering all 36 point. Resulting in a total pain in the ass! Before I put the unit back in I was wondering if it would beep if a fan went dead or was unplugged (like my DigiDoc 5). I proceeded to unplug my intake fan and see what happened. A VERY annoying and LOUD buzzer kept beeping, so in an attempt to make it stop I pressed the mode button and the buzzer would not stop! Let me tell you, this Buzzer was the most annoying thing I have EVER heard, so beware! A quick fix to this problem includes placing a drop of superglue into the speaker's hole or sticking a screwdriver through the speaker or unsoldering it. Needless to say, I chose the screwdriver approach.

After reinstalling the baybus into the 5.25" bay, I took a quick look at the LCD to see what was being displayed. Temperature readings were being shown on the LEFT of the screen in Celsius and the CPU Fan's RPM reading. By pressing the mode button, located to the right of the LCD, I was able to change the temperature monitor reading between all three, but the CPU Fan RPM reading stayed on during all mode settings. It ONLY shows the one CPU fan rpm. The last thing that I noticed on the LCD itself was the fact that the RPM reading only rounds to the nearest 50rpms and the display only shows 3 of the 4 numbers needed to show the fan rpm. They want you to multiply the number that you see by 10 (add a zero to the end)! In other words, a fan with 4560 rpm will only show was 456 on the LCD screen. The chrome rheobus knob on the front of the unit only controls one fan, which makes this rheobus a little useless for someone trying to control all case fans. As I plugged in the holy 92mm Vantec Tornado, I was not surprised that the Nexus was able to provide enough power - they're made by the same company! The normal RPM rating straight to the molex connector for a 92mm Vantec is around 4800 rpm. Take a look at the test results below.
Vantec 92mm
Tornado (4800rpm)
|
Highest
Setting |
Lowest
Setting |
|
4400 RPM |
2550 RPM |
Just to verify the results and prove the Nexus' worthiness to hold a 92mm Vantec Tornado, the most demanding fan for PC users, we decided to run it longer than normal. In fact, I left this controller on high for 3 and a Half DAYS and when I came back to check the conditions, it still worked no doubt about it. No capacitors blown, no transformers blown and it was still chugging the 92mm Tornado along at 4400rpm. Although the RPM on a 92mm Vantec Tornado is approximately 4800 rpm, and the Nexus could provide enough power for only 4400rpm, but this did not concern me. You will notice as we follow along with the review, that a fan controller rarely powers a large electrical consuming fan at the FULL rpm rating.

As you can see, the Nexus Multi-Function panel is quite different from most other fan controllers. Vantec, creator of the Nexus, combined a great looking color changing device with more functionality than you can imagine. Everything was included necessary for installation and the instructions are very detailed making it easy for anyone to figure out. The number of functions on this controller is outrageous. Most modders use front accessible USB and Firewire for video and picture importing and get tired of reaching around the back of their computer to plug it in. Although the controller was very appealing and did run the 92mm Tornado fan, I was not impressed in that it is only able to run ONE fan. Adding a switch or smaller knobs for multiple fan controlling would have been a real plus for this product, but that is not it's only function. The other thing that concerned me is the fact that Vantec made the LCD only display 3 of the 4 digits needed for fan RPM readings. In my opinion, this does take a huge chunk from the overall rating, as it could have been easily overcome. If you are looking for a controlling device which can do much more and don't mind the static green LCD, I would say go for it! This product can be purchased from Coolerguys.com for $39.95.
*UPDATE: I have noticed that this rheobus does have a problem when a fan is actually turned off. When a fan is off or unplugged, the LCD will go blank and stop displaying anything although the green backlights are still lit. I have researched this and seen it to be a constant problem for other users as well.
 < Previous Page 1/4
||
Next Page 3/4 >