|
LianLi PC-73SL Aluminum Chassis *World Exclusive*
Page: 2/2 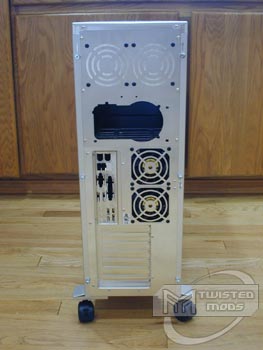 ????? ?????
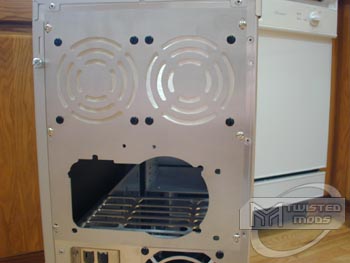 Let me tell you, the rear of this case is quite a sight. When I finally got the chance to flip the beast around and check out the backside, I couldn?t help but notice immediately the four wonderfully placed 80mm exhaust fans. Where should I start?! Starting at the bottom, this case is capable of handling a motherboard with a maximum of seven additional expansion slots. That?s pretty much standard, no matter what size case you examine. From the factory, each of the open slots is covered with sweet shiny covers that screw into place from the inside. They?re so shiny that I can see my reflection in them. I am not sure how many of you stare at the back of your cases, but if you do, this might be one to add to your list of future cases. Located just above the seven expansion slot openings is the obvious spot for the I/O shield, which pops into place and can be changed to fit the motherboard you intend to put in the case. The stock I/O Plate is designed to handle one gaming device, one parallel port, three stereo input/output ports, two Serial ports, two USB ports, and onboard Ethernet, as well as the obvious PS2 ports for mouse and keyboard. Located to the right of the I/O shield are two 80mm exhaust fans, which I found VERY unusual. Most cases have, at most, one 80mm exhaust fan located in the back along with the PSU fans, but Lian-Li spent plenty of time focusing on exhaust. The position of these fans puts them in a great place to suck air straight from the processor heatsink and send it straight out the back of the system! These two fans have the stock Lian-Li aluminum grills, which seem less restrictive than most stock fan grills, however, I would still make an effort to remove them. Holding the fans in place are Lian-Li?s famous black plastic pins, which many users have a problem removing. To remove them, simply use a knife to push the pin out from the inside ? it?s not too tough. Next is one of my favorite parts of this chassis. Filling the top portion of the rear is the power supply, as well as two more 80mm exhaust fans, for a total of four. You may be asking yourself why this is my favorite part, but if you have read any of my previous case reviews, you know I am a sucker for removable power supply plates. With the PC-73SL, Lian-Li has designed an enormous removable power supply plate, held in place by six Phillips screws, and is actually reversible (if you so dare) to place the power supply on the very top of the case, and the two additional fans below, instead of above. Removable power supply plates are an absolute plus when it comes to working on any computer, because they limit the possibility of cracking a CPU?s core (especially on a fragile AMD system) or other vital components. When a user is forced to take their power supply out through the inside of the case, it?s very easy to accidentally knock the heatsink on a system and damage the processor. Some systems may even require to you completely remove the motherboard to take out the power supply. Using a removable power supply plate, changing power supplies is VERY simple. All you have to do is unscrew the plate and pull the power supply out through the back, leaving the rest of the system components untouched. The two 80mm exhaust fan holes located above the power supply hole are covered with aluminum covers stock from the factory. They are obviously meant to be removed and replaced with actual fans, so I am not sure why Lian-Li wouldn?t just add two more fans and charge a couple bucks more, because with the way the front airflow is with this case, any additional airflow possible is absolutely necessary!  ????? ?????
 After removing the three thumb screws and placing them aside, I removed the side panel and noticed that even the side panel had soundproofing material on the inside! Lian-Li didn?t do a half-ass job by completing the front end and calling it done, they continued to soundproof the insides of each side panel, and even the TOP panel. I never expected even the top panel to be covered in padding! The picture of the inside of the side panel shows just how thin the soundproofing is, but the adhesive they used is very strong, and will not come off. If you are still thinking about putting windows in this case, I hope you?ve got a great plan to remove the soundproofed siding, or your window will be set back from the edge of the case about 1/8? which just won?t look right. If you?re willing to use a little bit of brute force and spend some time cleaning up the sticky gunk left behind, then putting a window in shouldn?t be too tough. After I admired the soundproofing for a couple minutes, I began to observe the very neatly designed interior of this prize winner. In the overall picture, you can see that even the backside/motherboard side panel is soundproofed. Again, Lian-Li amazes me with their attention to small details. You can see that since this is actually a server chassis, Lian-Li included a vertical bar, which is also constructed of light-weight aluminum, designed to apply pressure to any PCI or AGP cards and keep them in place so they do not fall out during transportation. Basically, long screws located on the left side of the aluminum bar can be screwed in to push the plastic tabs closer to the card, or unscrewed to loosen them up, depending on the side of the card. This is a great feature for people who move computers a lot, but if I were putting a window in this case, that aluminum bar would be the first thing to go. It is fastened by two thumbscrews on the top and two on the bottom. You will notice that Lian-Li uses thumbscrews for almost everything in their cases, which is convenient for the end user who doesn?t want to dig through a huge bag of tools to make a change to their computer. The last thing I want to point out in this picture is the amount of ?head-room? at the top of the case. With the power supply in place, the top of the case has nearly 5? of space for anything from air space to hiding wiring (which I would do in a heart beat). It also leaves plenty of room for the user to add a top blowhole for a water cooling radiator, without conflicting with any internal components.  ????? ?????
 Now we get the opportunity to look inside the case. Starting at the front, you finally get a chance to check out the six 5.25? bays as well as the two 3.5? bays stacked one on top of the other. One thing that I failed to mention earlier is that with the front panel unscrewed and placed aside, the front two 3.5? externally accessible bays may be removed, also with two thumbscrews. Just below the dual 3.5? rack is the biggest, beefiest hard drive rack assembly I have ever seen. Capable of holding up to six more hard drives, this hard drive assembly is equipped with rubber washers around each of the screw holes to limit vibration. This is also an effort on Lian-Li?s part to limit the amount of noise coming from the case. Rubber washers are used as dampeners to cushion the metal-to-metal contact typically present between hard drives and the hard drive rack. To accommodate the additional length required by the rubber washers, Lian-Li has included a number of screws which are quite a bit longer than usual, and will eliminate any problems with screw length. Make sure you keep a close eye on these screws, because most normal hard drive screws will not work ? you will have to reorder these directly from Lian-Li if they are lost. One thing I noticed as I was observing the anti-vibration washers is the fact that this is the first case manufactured by Lian-Li that holds the hard drives in a horizontal position, rather than the vertical position seen in older and more popular Lian Li cases. I remember hearing a while back on [H]ard|Forums that a couple members reported that their drives either wore out faster or were retrieving data faster when they were in the horizontal position. I have seen many members over at [H]ard|Forums modifying their Lian-Li drive cages to hold the hard drives horizontally, rather than vertically, as Lian-Li designed them. Whether these claims are true or false, I am not sure, but Lian-Li designed this case in such a way that drives can be held in their natural position, which is nice to see. As always, Lian-Li continued to play with their removable hard drive racks with this chassis. Removing this hard drive rack requires pulling two thumbscrews along the bottom of the drive cage and one that screws directly into the side of the floppy drive cage above (for added stability). Once those screws are removed, unfold the convenient handle, and slide the rack out of the left side of the case. VOILA! Located beneath the drive cage, and only accessible with the drive cage is removed, is the system speaker, which shoots sound directly out through holes in the bottom of the case. I like the system speaker under the drive cage, because it is in a stealth location that does not stand out obnoxiously. Once I had the chance to take a second look at the new, beefy drive cage, I also noticed that since the drive cage is so large, Lian-Li added a horizontal strengthening bar to prevent the hard drive rack from rocking side to side when loaded to full capacity. *standing ovation* How many times will I get to mention Lian-Li?s attention to small detail in this review?!?!  Here is a shot of the front of the chassis from inside, without the hard drive cage in place. You can see the two front intake 80mm fans, positioned to push cold air directly across the six hard drives, which is vital ? especially if you are running high speed drives for sustained periods of time. Whether you run 15,000 RPM SCSI or not, having nice intake air blowing on hard drives is a great idea. The cooler you can keep your hardware, the longer it should last ? believe me, it?s been proven. In this picture, you can also see the position of the system speaker located in the ?hole? below the hard drive cage. This is a great use of extra space on Lian-Li?s part. If you look a little closer at this picture, you will notice the beige USB cord coming in from the front access panel, below that bottom 80mm fan, and routed behind the hard drive cage. The front control panel (power, reset and LEDs) wires and 80mm fan cables are also routed in this manner. You can?t see it in this picture, but all the cords are tied together using a plastic clip with a sticky ?foot? that sticks to the bottom of the case. Lian-Li provided for minimal wire management, but all of this is covered by the hard drive cage anyways!  Although I haven?t yet mentioned it, another of the wonderful things about this case is the AWESOME range of support for motherboard layouts. Everything from mATX to full-size server boards capable of holding dual Intel Pentium 4 processors will work with this case ? just look at all of the holes in the motherboard tray! One of the things I have never enjoyed about the Lian-Li cases is their mounting method for motherboard stand-offs. While just about every other company uses stand-offs that screw into the motherboard plate, Lian-Li insists on using square holes. To actually mount the motherboard to the tray, you need to use metal ?clips? provided with this case, take off right side panel and push them into place from behind the motherboard tray. Although they do tend to stay in place fairly well, my concern would be that the clip either wears out or encounters some sort of pressure during it?s time where it will just pop out of place and set the motherboard right up against the motherboard tray, shorting everything. While I have not had a problem with this, and have never heard of anyone having this problem, it is bound to happen ? so just remember to be gentle when installing components, and don?t apply too much pressure to the motherboard in order to ensure that the motherboard stand-offs stay in place. Looking at the bottom panel of the case from inside, you can see the intake hole I mentioned earlier. Slits are cut into the aluminum panel on the bottom of the case, and inside is a piece of fan filter held in place by a plastic clip-in cover. On the top side of the plastic cover, the user can mount a fan to pull in air from underneath the case, directly upward, across the PCI and AGP cards. If I had the choice, I would first get rid of the filter and plastic cover covering the slits in the aluminum bottom case panel. The slits, covered by the filter, then having the holes just restricts airflow. If you have hardwood floors, as I do, that filter will clog with dust quickly, and block ANY airflow. You are probably thinking I?m a bit crazy to allow all that dust and dirt inside my case, but I?d rather have dust than overheated components. Either way, it?s a win-lose situation. On the inside of the rear panel, you will notice that the two 80mm exhaust fans also have the aluminum Lian-Li fan grills in place. In my honest opinion, these should also be removed. They just restrict airflow, and if you are the only one reaching inside your case, then you should know not to touch or get near the fans, and that?s assuming you are crazy enough to work on it with the computer on, anyways! Though it?s a bit tough to see, each of the shiny slot covers on the rear of the chassis are held in place with those aluminum thumbscrews that I have grown to love! This makes installation of components so much easier, especially when you are at a LAN party, not expecting to work on your computer, and you don?t have your tools. Simply unscrew with your thumbs (what a novel concept!) and start switching those components in a heartbeat! One last thing I want you to notice is the amount of space that the motherboard is allowed in this case. I was impressed when I saw that no hard drive racks or CD-Rom racks hang over the motherboard tray. The amount of space for wiring is impressive, and even airflow shouldn?t be too bad with this much space!  The last picture I have for you shows the actual power supply and extra fan compartment in the top left of the case. You can see from just this picture, with no measurements, that the area provided is absolutely enormous! With so much room, you could easily install a water-cooling pump, reservoir, and radiator in this area, and still keep it out of the way of your future window! Also in this picture, you will notice that the right side panel is also fully covered in the black soundproofing material even behind the motherboard ? no shortcuts taken! Above the power supply hole in the rear, you will notice the square pieces of brushed aluminum covering the extra two 80mm exhaust fan holes. If I removed these, I would probably take them to a water jet cutter and have custom fan grills designed and made ? they are already the right size for an 80mm fan, so why not take advantage of it?! Last, but not least, as obvious as it is, the power supply hole is located below those two extra 80mm fan openings, and the grate below is absolutely ingenious! When you own a high quality power supply, such as an Enermax or Antec, you will notice the 60mm, 80mm and now even 120mm cooling fans in the bottom of the power supply. When I go to install my Enermax into some of today?s cheaper cases, I run into a problem with the hard drive rack conflicting with the fan grill on the outside of the power supply. I am usually forced to either cut into the bottom of the power supply rack or find a way to flip the power supply so the intake fan is on the top, and completely ineffective. To solve this problem, Lian-Li has simply designed the grate you see in the bottom of the power supply rack to keep it from conflicting with power supply fan grills, and to allow for air to flow freely through the bottom of the power supply. While this may not be a huge concern for some, it shows once again the design consideration that Lian-Li put into this case. That is the kind of quality you pay for and actually get when you buy Lian-Li.  After being honored with the opportunity to check out Lian-Li?s new PC-73SL chassis, I can comfortably say that this case ranks about even with that of my other personal favorite, the U2-UFO Cube (also seen reviewed exclusively on our site). Amazingly enough, the previous Lian-Li PC-7323 chassis was by far my favorite chassis ever. I asked Lian-Li why they would name this the PC-73SL, and they explained that it was an upgraded version of the PC-7323, in a silent edition. When they said upgraded, they meant it completely! This is no ordinary chassis! With its light-weight aluminum construction weighing in at roughly 20lbs, and its awesome server-carrying capacity, it makes me wonder what?s next for Lian-Li. Although 20lbs is significant weight for an aluminum chassis, I think I?d cry if I had to lift a chassis of the same design made of steel?you?d need a forklift just to move it from room to room! The PC-73SL would be great for any user, whether they plan it for stationary office, room, and home use, or even LAN parties. The weight factor, combined with the casters and silent construction would not have me complaining about my computer being too loud while I?m trying to sleep, or too heavy while I?m transporting it. Lian-Li completely outdid themselves with this case. Just when I thought cases could not get any better, Lian-Li offered me the case of a lifetime; one that is so ?perfect? that any flaws could not be seen during this full evaluation. I have reviewed many cases in my time as a reviewer, and this is the first time that I have seen such a huge case with such great attention to detail. From the soundproofing foam lining the drive bay cut-outs to the removable power supply plate and indented power supply rack; including the anti-vibration rubber washers and special screws for the super-duty hard drive rack, and the extremely clean and professional front swinging aluminum door, there were no flaws that I could have seen under a magnifying glass even if I tried. One thing that deeply concerns me with this chassis is that airflow may be a bit troubled with the front grills, that small filter, and no ventilation holes. Then again, anyone with a hole saw and guts enough to drill into such a great piece of art can easily cure the problem! Since this chassis is not currently on the consumer market, no price has been named, however I?d imagine it won?t be cheap. While price is definitely an issue with aluminum cases in general, this case will definitely be worth every penny spent ? I give you my personal promise on this. This is by far one of the cleanest, best looking, most configurable, and sturdy aluminum chassis to date, and I am proud to have Lian-Li as an official sponsor of TwistedMods.com. I commend Lian-Li on their excellent job as always!   Here?s a great shot of my hand holding the drive bay while out of the chassis. You can see the folding handle pre-installed, the anti-vibration washers located where the hard drives will screw into place, and the horizontal strengthener bar to keep the drive bay from flexing when filled with expensive hard drives.  ?A quick snap of the inside of the chassis from the rear looking forward at a downward angle. You can see the aluminum rail running vertically designed to apply pressure on the PCI and AGP cards as well as the bottom intake hole. < Previous Page 1/2 |
||||||||||||||||||||


