|
Ancient Chinese Dremel Techniques
Page: 4/6
The Process
Now here is where the real work starts. Some overall advice: 
Notice how I just traced around the pattern. I took the edge of my cutting blade and made a small groove all around the pattern I planned to cut. This helps to keep your blade on the right track later on when you cut all the way through. 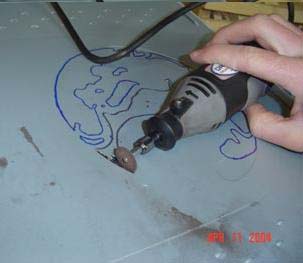 ????? ?????

Here, I just started cutting. I cut all the way through on the first line, and cut a line up and down, breaching into the curved line. 
Here, I simply cut lines right beside each other until the gap was gone between the original two cuts. Now, all you do is use the tip of the cutting blade and wiggle it back and forth with the tip, right on the little point that may still be standing, until it is visually pleasing to you. Moving on? Cut the corner just above that one, pretty much the same way, and then just cut the curves that aren?t sharp at all, they shouldn?t cause a problem. 
Here, I?ve cut along the curve until I came across this sharp curve. I made indentions at different points on the curve, without going through the line. I did this because a cutting blade has too large of a diameter to fit into the small curve. This is one of the only ways to cut the curve. 
Now, to get rid of the bits that didn?t get cut, crank up the cutting blade, slide it up by one of the bits, and start moving it back and forth to the sides, like the arrows indicate. This will grind through the bits hanging down, and then just wiggle that edge in the same direction to make the curve a little smoother? Just like the arrows indicate. < Previous Page 3/6 || Next Page 5/6 > |
||||||||||||||||||||


